Showing posts with label DIY. Show all posts

Wednesday, December 19, 2012

Quick, Inexpensive Teacher Gift Idea + Free Printables For You!

Still need a last minute, quick, inexpensive gift idea for the many teachers in your kids' lives?


Here's what I did.

Mini dollar frames from Michaels + scans of several favorite art pieces + typed words in a favorite font. Cut out different elements and rearranged into little mini collages.  That way it still felt like each piece was unique and handmade, without me having to start from scratch!  Just glue-sticked the pieces together and walllah!

I didn't like the clear plastic in the frame openings (it didn't lay flat and kind of warped the image) so I cut them out with an exact-o knife and ended up slapping a quick layer of mod podge on top of the art to seal and protect.

Want some help?

Here are 2 small images (approx. 2x3 inches) which you can print out for your personal use.**

Click on the link below each picture to a google docs pdf:

print here


This red and purple owl can be made into a cute little ornament by printing on paper or card stock and mod-podging to mat board or any other type of thin cardboard (like from your cereal box) that you probably already have lying around in your recycling bin.  Feel free to cut off my scallop border and get out a sharpie to make your own doodle-y frame!  Polk a hole and string with ribbon, string, twine, yarn etc.


print here

This little green owl will fit into a frame with a 2 inch x 3 inch opening - like the mini frames in the $1 bins at the front of Michaels!  Just print on paper or card stock and insert in frame!  (You choose whether you want to eliminate the clear plastic in the opening.  Just be aware that if you do cut it out, you may want to seal your art to protect it.)


**If you use either of our owl images, or if you just need a fun gift tag, please use ours below!  (Print on card stock. )

 Also printable by clicking on the link to a google docs pdf:


print here
Here's one more quick "to and from" idea:
decorative tape from Target's  "Kid Made Modern" craft line + sharpies!

And here's a link to the owly teacher gifts I made last year.

How about you?  What did you come up with for teacher gifts this year?  Share in the comments - links are welcome!   Maybe you'll be helping someone else out who's looking for some last minute inspiration!


Tuesday, December 20, 2011

Teacher Christmas Gifts


Today was the last day of school for our kids before winter break!  Are you ready?! 

Here's a peek at Christmas gifts I made for the various teachers in our boys' lives.  These wise old owls say,

"Do your best.  *BE your best."

I chose this message because I thought it was a great encouragement to both teachers and students.   (We have a friend who is a school guidance counselor who loved this message for her office - so I knew other teachers would appreciate it as well.)

On the back of each art block I wrote a personal message, thanking each teacher for how they bring out the best in their students.  We are so blessed to have phenomenal teachers in the ICCSD who care deeply about our kids.  This small token of our appreciation doesn't nearly measure up to the hard work and dedication that these people show on a daily basis.     

*UPDATE:  Because we've received so many questions about the process, I thought I'd tell you a bit more about how these were made. 

I bought an 8ft long 2x4 (Very inexpensive - only around $3!) at Menard's and had my husband cut them into 4in. increments.  As a 2x4 is actually more like 3 1/2 inches wide, this made my blocks not quite square, but cutting was much easier, quicker + came out even that way.  I painted the blocks in a variety of my favorite colors with craft acrylics, then created the owl from my patterned paper scraps and mod podge.  Another layer of acrylics + sharpie marker were added for the owl details.  Printed my quotes out and added those as well.  Pretty easy, fast, and definitely inexpensive, as I had all the materials on hand, other than the 2x4.  Just a small token of our appreciation, but meaningful!

We are so excited about all of the new visitors that this project has brought our way recently!  If you're new, we welcome you whole-heartedly and hope you'll stick around awhile!   Visit our About page to meet our artsy family, check out our line of "family values"-themed art and home decor items called "This Thing Called Family" and like our facebook page for lots of fun updates and goofiness!  

I added fun, doodle-y lines to the sides of the blocks.

So now that the kids are home from school..... "quiet" is a thing of the past.  Let the wild ruckus begin! 

Did you make teacher gifts this holiday season?  Leave us a comment - we're interested to hear about what you made!  

If you blog, we'd love to see your post about teacher gifts you made too, so feel free to leave us the links so we can come and visit!  

*Linking to Flamingo Toes!

Friday, October 28, 2011

Accessories from Vintage Ties (No Sew!)

The other day I was browsing through Goodwill on a hunt for a red and yellow striped tie for my son's Harry Potter Halloween costume.  I did not find one, but I did find a red one that I ended up painting yellow stripes on!  While digging around, several other vintage-y men's ties caught my eye because of their patterns, textures and colors.  I didn't know exactly what I was going to do with them, but knew that I wanted to try my hand at making some flowers for hair accessories.  At $1.37 a tie, it wasn't a huge investment to bring these home: 


Gathered some more supplies at a trip to Wal-Mart:  cheap headbands from the hair product section and alligator-type hair clips from the craft and bead department:


I started by ripping out the seam up the back of the tie.  Pretty easy work as many of the ties were a bit worn out!


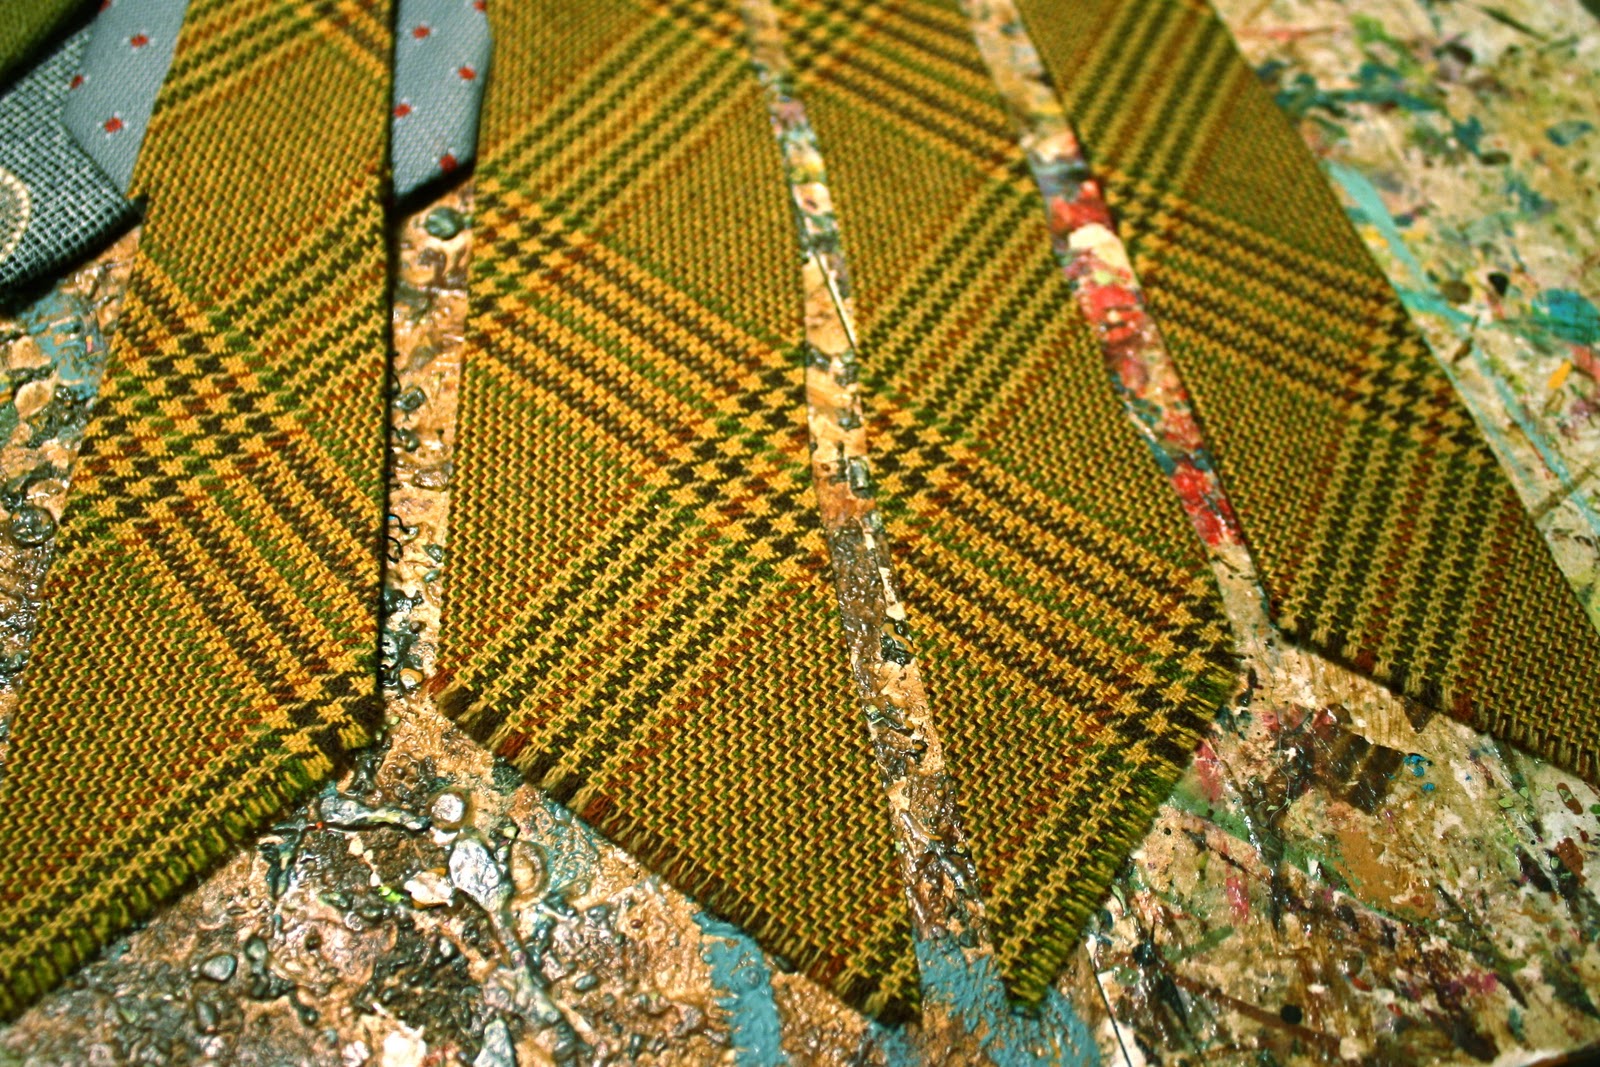
Once it was opened up, the inside lining removed and laid out flat, I realized I could easily divide the tie into 4 long strips of fabric, by cutting down the length on the creases and then cutting up the middle:

Cool!  I could get 4 flowers - at least - out of one tie!

Starting at the narrower end of one strip, I tied a knot:


And started wrapping the fabric around the knot, twisting the fabric and hot gluing as I went, until I ended up with the size flower I wanted:


Most of the flowers I made required less than one strip of fabric!   After making several flowers, it was time to move on to a headband.  The key to wrapping the headband was to start with two small strips of fabric cut as narrow as the headband to fold over and glue to the tips of each end.  Then it was just a matter of wrapping around, gluing as I went:


I tried my headband on in the mirror, to see exactly where I wanted to glue my flowers, then glued them on, off-centered:


ta-da!


ta-da!


I also made some single flower hair clips.   For me, the alligator type clip was crucial, because I also wanted to be able to use the flowers to accessorize my scarves:


Gluing the clip on required me to work quickly:  I laid down some glue, adhered the clip, but kept it open so that the other side didn't get caught in the glue, then laid down a scrap of fabric to cover the glued side of the clip.  It made a very strong bond!

ta-da!


I love that this same type of clip works with my scarves too!


I spied this plain leather cuff at Goodwill, and added a flower to it too!


After some more flower making, I ended up with one strip from each tie leftover.  This gave me the idea to combine them into a braid.  I googled how to braid with 4 strands and after some experimenting, figured out how to incorporate the braiding around a headband.  I know this picture is not great, but it gives you an idea of how I staggered the strips when I glued them on.  I also made sure to have two strips on one side and two on the other to start my braiding.


For this braided headband, I wanted a different kind of flower that incorporated all of the different fabrics that I'd used in the braid.  I gathered some scraps from the wider ends of the ties and hot glued little gathers:


until I had a rough circle:


Added a slightly smaller one from another fabric:

 
And then added an even smaller flower of the "knot, wrap and twist" variety from above:


Trimmed it up a bit, then glued to my braided headband:
 

Ta-da!


Lastly, I decided to try my hand at some 'feathers.'


They were too flimsy as is, so I hot glued a smaller piece of the tie lining to the backs of the feathers to make them stiffer:


Here's what I ended up with:


Now I have a nice new collection of hair accessories!


Geesh!  Now don't get carried away!  Maybe just one at a time:


I'm contemplating making more to sell, but it was a lot of farting around!  I'm hoping that now that I'm done with the thinking and experimenting phase, the next batch would go quicker!

Do you think people would buy them?  I've been wearing mine around town this week and have gotten several compliments!


*linking this project to Flamingo Toes,  Be Different...Act Normal,  Whipperberry and Tater Tots and Jello.